Lightning is a calender extension for Thunderbird. Thunderbird has built-in support for searching and installing add-ons. But unfortunately this search function does not find lightning for 64 bit Ubuntu.
One way of installing the extension is to find a 64 bit compiled extension in Mozillas archives. But the archives seems to have a lack of files with precompiled 64 bit versions for Linux.
I found out that the easiest way to install Lightning on a 64 bit Ubuntu (in this case Ubuntu 11.10) is to install it with apt-get. Install it by running this command:
sudo apt-get install xul-ext-lightning
When you start Thunderbird the next time Lightning will show up!
lördag 4 februari 2012
onsdag 18 november 2009
How to install winepulse for Ubuntu Karmic 9.10
(I've also verified that this guide works for Ubuntu Lucid 10.04)
I use Spotify alot in Ubuntu as my music player, although I've experienced disturbance and crapy sound when playing songs. If you like me has experienced disturbance when playing sound from wine winepulse can be a good idea to test. The wine application that is shipped with Karmic today is only supporting ALSA, OSS and some others. But it is not supporting pulseaudio (yet).
The following steps shows how to install a patched package of wine patched with pulseaudio support. The package is maintained by Neil Wilson. See this page for more info about the package.
Note: Install winepulse at your own risk. It is not a standard package so it could break something for you. It works for me though :)
Step 1:
Open Synaptics and select -> Settings->Repositories
Step 2:
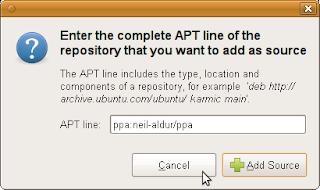
Other Software-> Add...
Select "ppa:neil-aldur/ppa" as ATP-line
Step 3:
Reload package information in Synaptics with the reload button (or just press Ctrl+R)
Step 4:
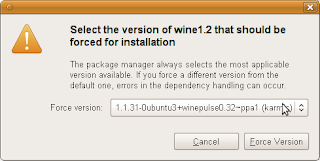
Search for the "wine" package in Synptics. Select the wine1.2 package and choose from the menu Package-> Force Version.. (or just Ctrl+E)
Select the special winepulse version.
Step 5:
wine1.2 should now be marked for upgrade. Now select apply.
Step 6:
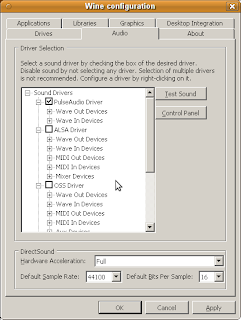
In console run : winecfg
Step 7:
Select the Audio tab and check that PulseAudio is now selected as the currently used driver.
Step 8:
Now enjoy wine with pulseaudio sound!
I use Spotify alot in Ubuntu as my music player, although I've experienced disturbance and crapy sound when playing songs. If you like me has experienced disturbance when playing sound from wine winepulse can be a good idea to test. The wine application that is shipped with Karmic today is only supporting ALSA, OSS and some others. But it is not supporting pulseaudio (yet).
The following steps shows how to install a patched package of wine patched with pulseaudio support. The package is maintained by Neil Wilson. See this page for more info about the package.
Note: Install winepulse at your own risk. It is not a standard package so it could break something for you. It works for me though :)
Step 1:
Open Synaptics and select -> Settings->Repositories
Step 2:
Other Software-> Add...
Select "ppa:neil-aldur/ppa" as ATP-line

Step 3:
Reload package information in Synaptics with the reload button (or just press Ctrl+R)
Step 4:
Search for the "wine" package in Synptics. Select the wine1.2 package and choose from the menu Package-> Force Version.. (or just Ctrl+E)
Select the special winepulse version.

Step 5:
wine1.2 should now be marked for upgrade. Now select apply.
Step 6:
In console run : winecfg
Step 7:
Select the Audio tab and check that PulseAudio is now selected as the currently used driver.

Step 8:
Now enjoy wine with pulseaudio sound!
fredag 3 oktober 2008
How to run dual screen with Intel i810 driver and MergedFB
This is how I configured my laptop with an Intel graphics driver i810 to use my dual screens. I've tested this setup with Ubuntu Hardy. But I guess this configuration could work with other dists too. In my setup I use MergedFB since I had some problems with wrong positioned windows when running wine programs with Xinerama.
I have the following setup: HP laptop (nc6220) in a docking station with two LCD screens (SyncMaster 740T) connected to it. One connected with a VGA cable and the other one with DVI. Sometimes I do not have my laptop in the docking station so I'll also show how I did to switch between the laptop monitor and the dual screens by using different ServerLayouts.
First, to be able to choose ServerLayouts we must start X manually. So we must disable gdm login:
Remember to take a backup of your xorg.conf before starting editing it:
Ok, so here is the xorg.conf file with all the magic. Store it as xorg.conf in /etc/X11/:
To start with dual screen setup simply just run:
To use the laptop monitor I've created a simple bashscript:
I have the following setup: HP laptop (nc6220) in a docking station with two LCD screens (SyncMaster 740T) connected to it. One connected with a VGA cable and the other one with DVI. Sometimes I do not have my laptop in the docking station so I'll also show how I did to switch between the laptop monitor and the dual screens by using different ServerLayouts.
First, to be able to choose ServerLayouts we must start X manually. So we must disable gdm login:
sudo update-rc.d -f gdm remove
Remember to take a backup of your xorg.conf before starting editing it:
sudo cp /etc/X11/xorg.conf /etc/X11/xorg.conf.backup
Ok, so here is the xorg.conf file with all the magic. Store it as xorg.conf in /etc/X11/:
Section "Files"
 FontPath "/usr/share/X11/fonts/misc"
 FontPath "/usr/share/X11/fonts/cyrillic"
 FontPath "/usr/share/X11/fonts/100dpi/:unscaled"
 FontPath "/usr/share/X11/fonts/75dpi/:unscaled"
 FontPath "/usr/share/X11/fonts/Type1"
 FontPath "/usr/share/X11/fonts/100dpi"
 FontPath "/usr/share/X11/fonts/75dpi"
 # path to defoma fonts
 FontPath "/var/lib/defoma/x-ttcidfont-conf.d/dirs/TrueType"
EndSection

Section "Module"
 Load "i2c"
 Load "bitmap"
 Load "ddc"
 Load "dri"
 Load "extmod"
 Load "freetype"
 Load "glx"
 Load "int10"
 Load "type1"
 Load "vbe"
EndSection

Section "InputDevice"
 Identifier "Generic Keyboard"
 Driver  "kbd"
 Option  "CoreKeyboard"
 Option  "XkbRules" "xorg"
 Option  "XkbModel" "pc105"
 Option  "XkbLayout" "se"
EndSection

Section "InputDevice"
 Identifier "Configured Mouse"
 Driver  "mouse"
 Option  "CorePointer"
 Option  "Device"  "/dev/input/mice"
 Option  "Protocol"  "ExplorerPS/2"
 Option  "ZAxisMapping"  "4 5"
 Option  "Emulate3Buttons" "true"
EndSection

Section "InputDevice"
 Identifier "Synaptics Touchpad"
 Driver  "synaptics"
 Option  "SendCoreEvents" "true"
 Option  "Device"  "/dev/psaux"
 Option  "Protocol"  "auto-dev"
 Option  "HorizScrollDelta" "0"
EndSection

Section "InputDevice"
  Driver        "wacom"
  Identifier    "stylus"
  Option        "Device"        "/dev/wacom"


  Option        "Type"          "stylus"
  Option        "ForceDevice"   "ISDV4"
EndSection

Section "InputDevice"
  Driver        "wacom"
  Identifier    "eraser"
  Option        "Device"        "/dev/wacom"


  Option        "Type"          "eraser"
  Option        "ForceDevice"   "ISDV4"
EndSection

Section "InputDevice"
  Driver        "wacom"
  Identifier    "cursor"
  Option        "Device"        "/dev/wacom"


  Option        "Type"          "cursor"
  Option        "ForceDevice"   "ISDV4"
EndSection


Section "Device"
  Identifier          "Videocard0"
  Driver                "i810"
  BusID                "PCI:0:2:0"
  Option                "MonitorLayout" "DFP,CRT" #Note: the VGA connected screen must be configured as a CRT monitor
  VideoRam        65536

  Option  "DRI"                           "true"
  Option  "MergedFB"                      "true"
  Option  "SecondPosition"                "RightOf"
  Option  "MetaModes"                     "1280x1024-1280x1024"
  Option  "SecondMonitorHorizSync"        "30-81"
  Option  "SecondMonitorVertRefresh"      "56-75"
EndSection

Section "Device"
 Identifier "laptopdevice"
 Driver  "i810"
 BusID  "PCI:0:2:0"
EndSection

Section "Monitor"
 Identifier "Laptop Monitor"
 Option  "DPMS"
EndSection

#Monitor for dual mode
Section "Monitor"
    Identifier          "Monitor0"
    Option                "DPMS"
    HorizSync   30.0 - 81.0
    VertRefresh 56.0 - 75.0
EndSection

#Screens for dual mode
Section "Screen"
          Identifier      "Screen0"
          Device           "Videocard0"
          Monitor           "Monitor0"
          DefaultDepth      24
          SubSection "Display"
                Depth           24
                Modes           "1280x1024" "1024x768"
          EndSubSection
          SubSection "Display"
                Depth           16
                Modes           "1280x1024" "1024x768"
          EndSubSection
          SubSection "Display"
                Depth           24
                Modes           "1280x1024" "1024x768"
          EndSubSection
EndSection

#laptop screen
Section "Screen"
 Identifier "Laptop Screen"
 Device  "laptopdevice"
 Monitor  "Laptop Monitor"
 DefaultDepth 24
 SubSection "Display"
  Depth  1
  Modes  "1400x1050"
 EndSubSection
 SubSection "Display"
  Depth  4
  Modes  "1400x1050"
 EndSubSection
 SubSection "Display"
  Depth  8
  Modes  "1400x1050"
 EndSubSection
 SubSection "Display"
  Depth  15
  Modes  "1400x1050"
 EndSubSection
 SubSection "Display"
  Depth  16
  Modes  "1400x1050"
 EndSubSection
 SubSection "Display"
  Depth  24
  Modes  "1400x1050"
 EndSubSection
EndSection

# Serverlayout for laptop mode
Section "ServerLayout"
 Identifier "laptop"
 Screen  "Laptop Screen"
 InputDevice "Generic Keyboard"
 InputDevice "Configured Mouse"
 InputDevice     "stylus" "SendCoreEvents"
 InputDevice     "cursor" "SendCoreEvents"
 InputDevice     "eraser" "SendCoreEvents"
 InputDevice "Synaptics Touchpad"
EndSection

# Serverlayout for dual screen mode
Section "ServerLayout"
    Identifier      "dual"
    Screen "Screen0"
    InputDevice      "Generic Keyboard"
    InputDevice      "Configured Mouse"
    InputDevice      "Synaptics Touchpad"
EndSection

# Choose here which one that should be default e.g. when running # startx
Section "ServerFlags"
  # Option "DefaultServerLayout" "laptop"
  Option "DefaultServerLayout" "dual"
EndSection

Section "DRI"
 Mode 0666
EndSection
To start with dual screen setup simply just run:
startx
To use the laptop monitor I've created a simple bashscript:
#!/bin/bash
startx -- -layout laptop
Prenumerera på:
Inlägg (Atom)